
| 일 | 월 | 화 | 수 | 목 | 금 | 토 |
|---|---|---|---|---|---|---|
| 1 | 2 | 3 | 4 | 5 | ||
| 6 | 7 | 8 | 9 | 10 | 11 | 12 |
| 13 | 14 | 15 | 16 | 17 | 18 | 19 |
| 20 | 21 | 22 | 23 | 24 | 25 | 26 |
| 27 | 28 | 29 | 30 |
- UICollectionViewFlowLayout
- dispatchsource
- font book
- WeatherManager
- 러닝타이머
- MKMapViewDelegate
- SwiftUI Boolean 값
- CLLocationManagerDelegate
- 한국어 개인정보처리방침
- Required Reason API
- 단일 책임원칙
- Xcode
- 클로저의 캡슐화
- xcode로 날씨앱 만들기
- UIAlertAction
- swift
- weatherKit
- MKMapItem
- 러닝기록앱
- Protocol
- 서체관리자
- Startign Assignments
- 영문 개인정보처리방침
- weak var
- CoreLocation
- App Store Connect
- Timer
- RunningTimer
- AnyObject
- addannotation
- Today
- Total
VesselWheel
MapKit을 활용한 킥보드 앱 지도화면 만들기 본문
들어가기 앞서, 앱에서 지도를 구현할 때 다양한 지도 서비스가 있다.
지도 API를 비교한 블로그글을 참고하면 성능부터 비용까지 자신의 앱에 알맞는 서비스를 선택할 수 있다.
[지도 API 비교 블로그]
비용성 측면에서 다양한 기능을 제공하는 상업성 지도(구글, 네이버, 카카오)는 궁극적으로 비용이 발생
하지만 Mapkit은 비용이 발생하지 않고, 퍼스트파티로 UIkit과의 연동성이 높다.
따라서, Apple의 first party인 MapKit을 사용하기로 했다.
https://developer.apple.com/maps/
Apple Maps - Apple Developer
Apple Maps is the best way to navigate and explore the world. MapKit lets you bring the world’s most detailed city experiences from Apple Maps to your apps and websites, all with a focus on privacy. And you can use the new Maps Server API to create more
developer.apple.com
xcode 버전에 따라, MapKit 사용을 위해선 xcode에서 사전 작업이 필요하다.
MapKit 링크하기
- 프로젝트 설정을 열고 “General” 탭을 선택한 다음, 스크롤을 내려서 “Frameworks, Libraries, and Embedded Content” 섹션을 찾으세요. 플러스 버튼을 눌러서 MapKit.framework 을 추가합니다.

코드단에서 MapKit 사용하기
1. Xcode 15.2 (2024.2.21 기준)에서는 별도의 설치 없이, import MapKit으로 사용할 수 있다.
//
//  MapViewController.swift
//  Kick_Going
//
//  Created by Jason Yang on 1/15/24.
//

import UIKit
import MapKit

class MapViewController: UIViewController, CLLocationManagerDelegate, MKMapViewDelegate {
    // MARK: - 델리게이트 프로토콜
    weak var registrationDelegate: RegistrationDelegate?

    // MARK: - UI Properties

    @IBOutlet weak var kickGoingMap: MKMapView!
    @IBOutlet weak var buttonBarrow: UIButton!
    @IBOutlet weak var buttonKickboard: UIButton!
    @IBOutlet weak var buttonBicycle: UIButton!
    @IBOutlet weak var currentLocation: UIButton!

    @IBOutlet weak var searchBar: UISearchBar!

    // MARK: - Properties
    var dataSource: [RideData] = []
    var kickboardItems: [RideData] = [
        RideData(id: 0, title: "킥보드1", subtitle: "대여가능", latitude: 37.5665, longitude: 126.9774),
        RideData(id: 1, title: "킥보드2", subtitle: "대여 중", latitude: 37.5660, longitude: 126.9805),
        RideData(id: 2, title: "킥보드3", subtitle: "대여가능", latitude: 37.5640, longitude: 126.9791),
        RideData(id: 3, title: "킥보드4", subtitle: "대여가능", latitude: 37.5658, longitude: 126.9818),
        RideData(id: 4, title: "킥보드5", subtitle: "대여 중", latitude: 37.5647, longitude: 126.9768),
    ]
    var bicycleItems: [RideData] = [
        RideData(id: 0, title: "자전거1", subtitle: "대여가능", latitude: 37.5665, longitude: 126.9770),
        RideData(id: 1, title: "자전거2", subtitle: "대여가능", latitude: 37.5662, longitude: 126.9801),
        RideData(id: 2, title: "자전거3", subtitle: "대여가능", latitude: 37.5643, longitude: 126.9793),
        RideData(id: 3, title: "자전거4", subtitle: "대여가능", latitude: 37.5655, longitude: 126.9815),
        RideData(id: 4, title: "자전거5", subtitle: "대여가능", latitude: 37.5642, longitude: 126.9763),
    ]

    let locationManager = CLLocationManager()

    enum RentalItemType {
        case kickboard(RideData)
        case bicycle(RideData)
        case none
    }

    var selectedKickboardID: Int?
    var selectedBicycleID: Int?
    // MARK: - Life Cycle

    override func viewDidLoad() {
        super.viewDidLoad()

        // Do any additional setup after loading the view.
        locationManager.delegate = self
        locationManager.desiredAccuracy = kCLLocationAccuracyBest
        locationManager.requestWhenInUseAuthorization()
        locationManager.startUpdatingLocation()
        kickGoingMap.showsUserLocation = true
        kickGoingMap.delegate = self
        // 지도의 중심 좌표와 줌 레벨 설정
        let center = CLLocationCoordinate2D(latitude: 37.565534, longitude: 126.977895) // 서울 시청
        let region = MKCoordinateRegion(center: center, span: MKCoordinateSpan(latitudeDelta: 0.01, longitudeDelta: 0.01))
        kickGoingMap.setRegion(region, animated: true)
    }
2. Storyboard를 기준으로 할 때는, Objects 중에 Map Kit View를 추가해준다.
@IBOutlet weak var kickGoingMap: MKMapView!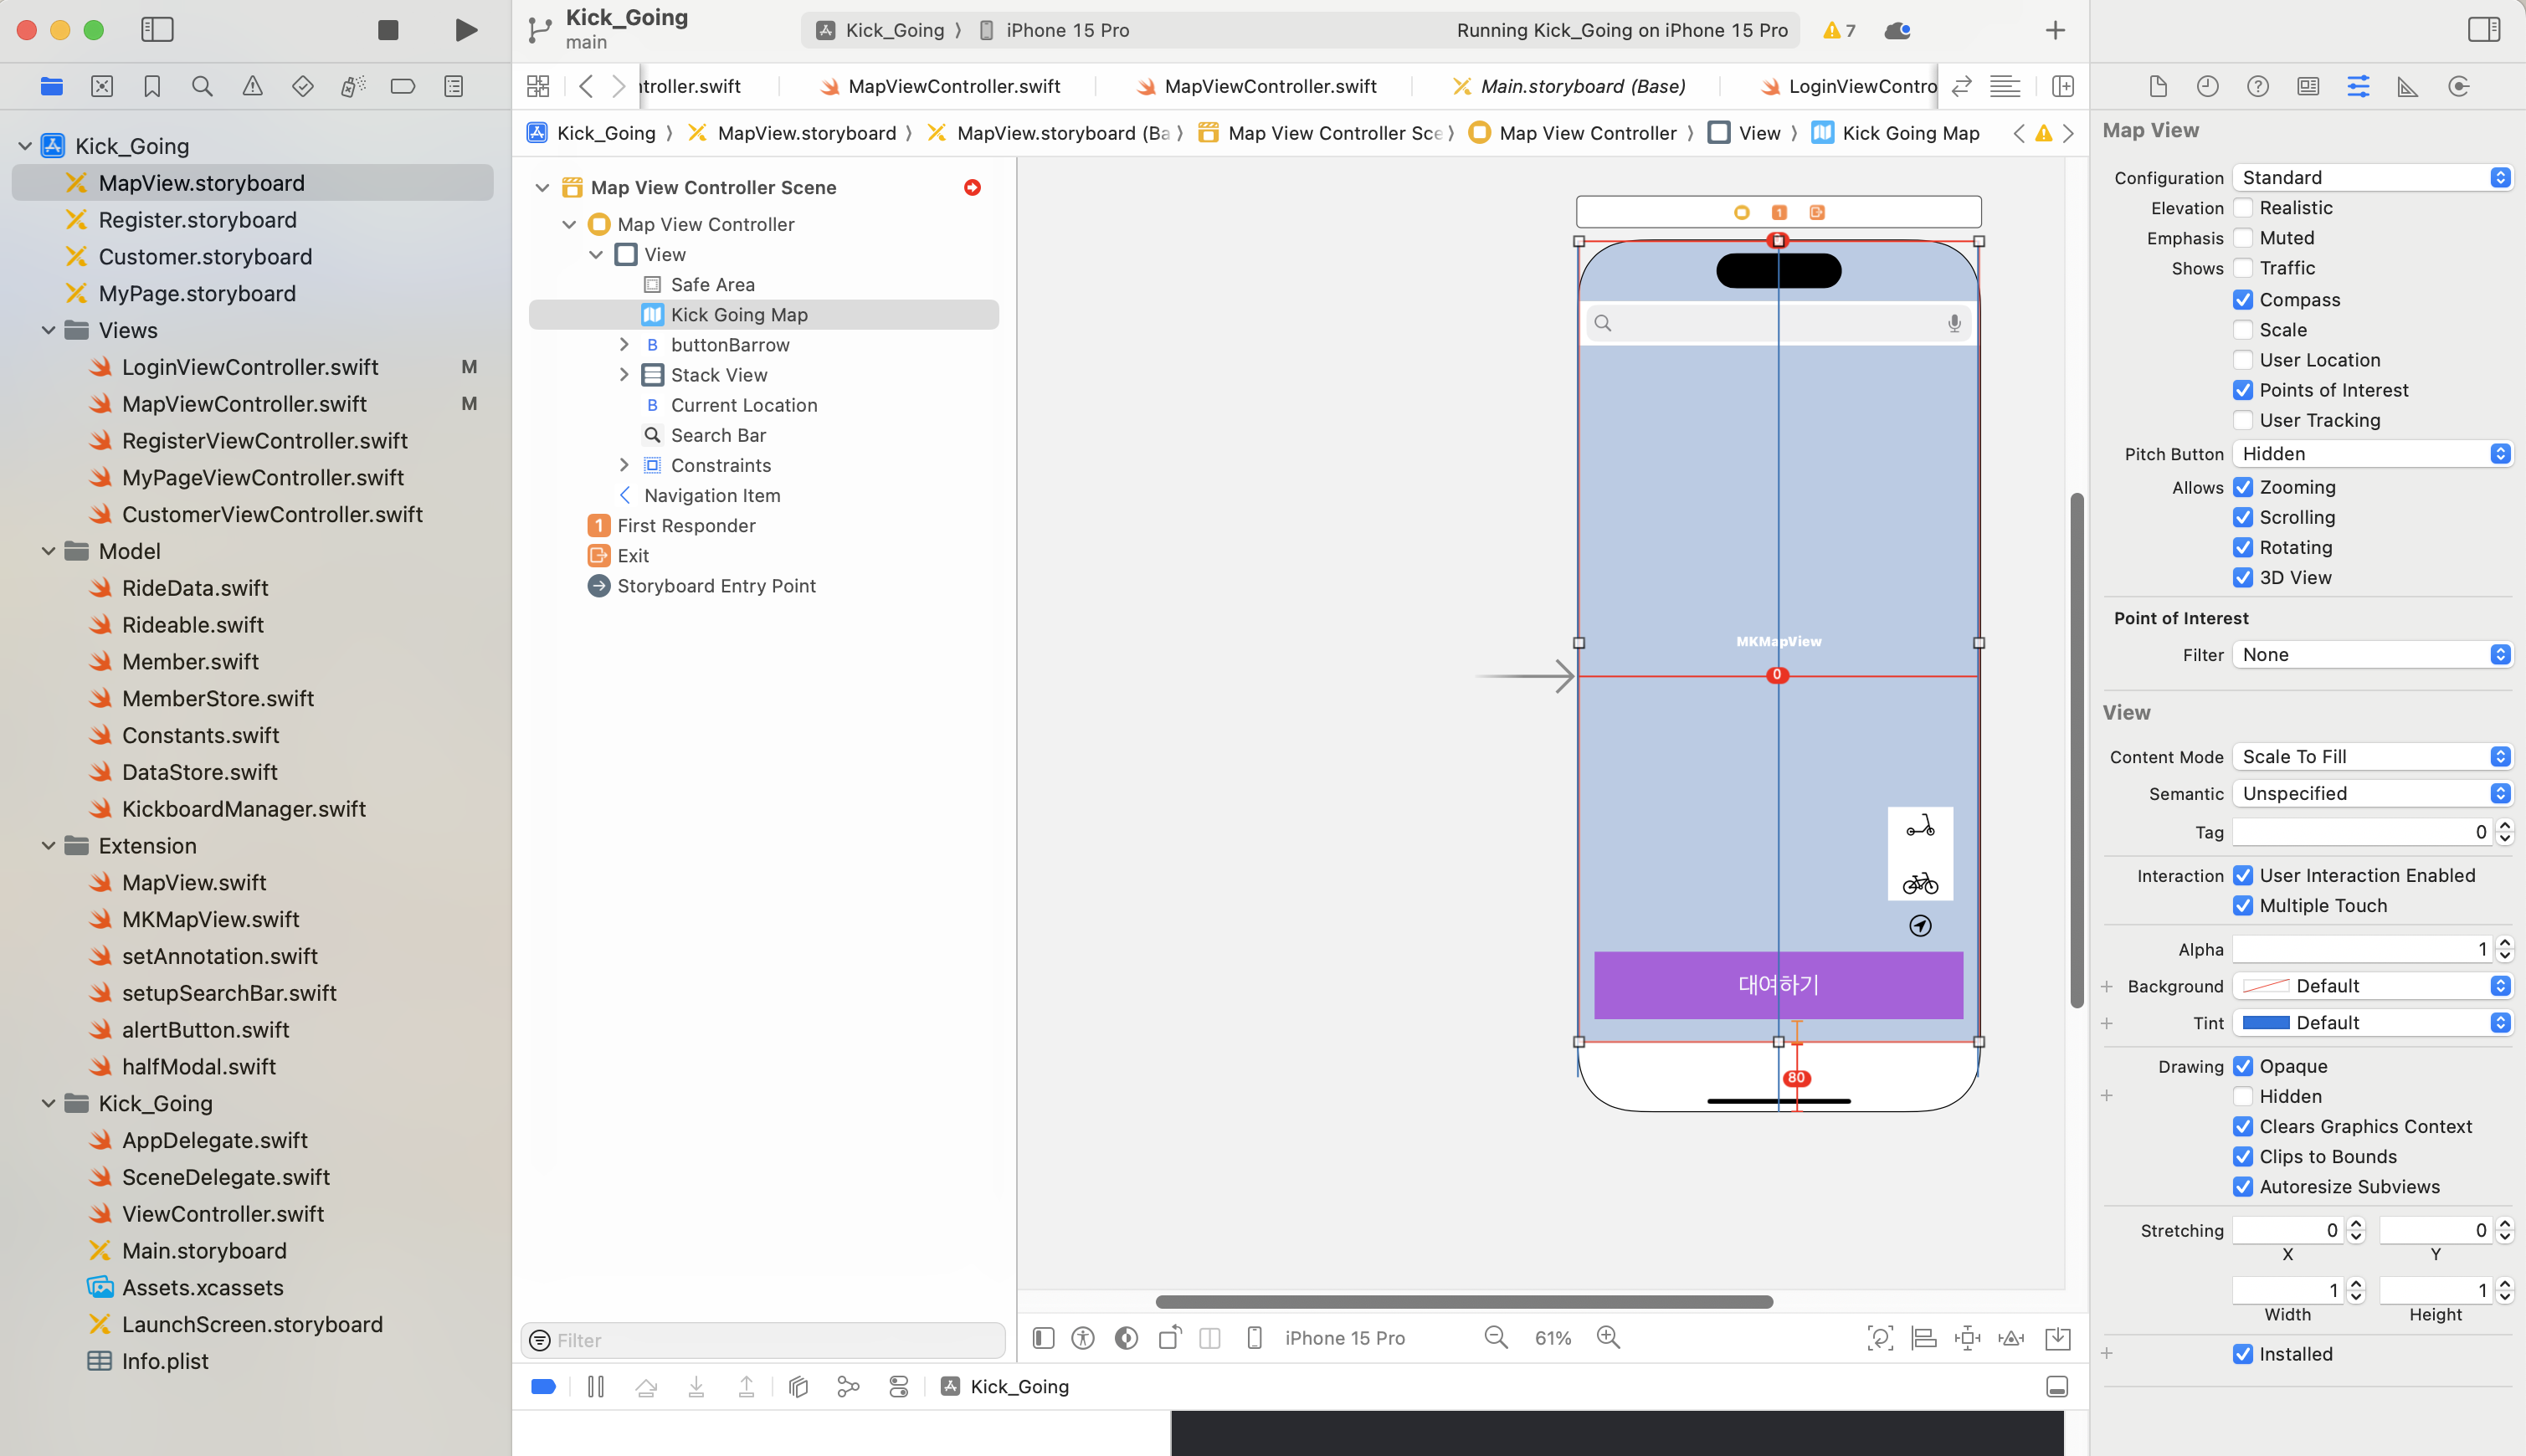
-> editor 네비게이터에서 보면,
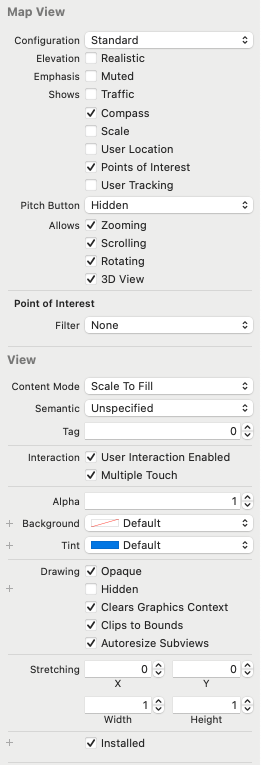
3. 지도의 스타일인 Configuration에서 Standard, imagery, Hybrid을 선택할 수 있고, 그 외의 설정을 할 수 있다.
4. 코드로 돌아와서, MapKit의 locationServicesEnabled 하기 위해, CLLocationManager을 프로퍼티 locationManager에 프로퍼티화 해준다.
let locationManager = CLLocationManager()
5. 이어서, Life-Cycle을 보면
override func viewDidLoad() {
        super.viewDidLoad()

        // Do any additional setup after loading the view.
        locationManager.delegate = self
        locationManager.desiredAccuracy = kCLLocationAccuracyBest
        locationManager.requestWhenInUseAuthorization()
        locationManager.startUpdatingLocation()
        kickGoingMap.showsUserLocation = true
        kickGoingMap.delegate = self
        // 지도의 중심 좌표와 줌 레벨 설정
        let center = CLLocationCoordinate2D(latitude: 37.565534, longitude: 126.977895) // 서울 시청
        let region = MKCoordinateRegion(center: center, span: MKCoordinateSpan(latitudeDelta: 0.01, longitudeDelta: 0.01))
        kickGoingMap.setRegion(region, animated: true)
    }
해석
1. `locationManager.delegate = self`: 현재 클래스를 위치 관리자의 대리자로 설정합니다. 이렇게 함으로써 위치 관련 이벤트가 발생할 때마다 현재 클래스에서 정의된 메소드가 호출됩니다.
2. `locationManager.desiredAccuracy = kCLLocationAccuracyBest`: 위치의 정확도를 최고로 설정합니다. 이는 배터리 사용량을 늘리지만, 가능한 한 가장 정확한 위치 정보를 제공합니다.
3. `locationManager.requestWhenInUseAuthorization()`: 앱이 사용 중일 때 위치 정보에 접근할 수 있도록 사용자에게 권한을 요청합니다.
4. `locationManager.startUpdatingLocation()`: 위치 업데이트를 시작합니다. 이는 사용자의 현재 위치를 지속적으로 추적합니다.
5. `kickGoingMap.showsUserLocation = true`: 지도에 사용자의 현재 위치를 표시합니다.
6. `kickGoingMap.delegate = self`: 현재 클래스를 지도의 대리자로 설정합니다. 이렇게 함으로써 지도 관련 이벤트가 발생할 때마다 현재 클래스에서 정의된 메소드가 호출됩니다.
7. `let center = CLLocationCoordinate2D(latitude: 37.565534, longitude: 126.977895)`: 서울 시청의 위도와 경도를 사용하여 CLLocationCoordiante2D 객체를 생성합니다.
8. `let region = MKCoordinateRegion(center: center, span: MKCoordinateSpan(latitudeDelta: 0.01, longitudeDelta: 0.01))`: 위에서 생성한 center 객체와 지정한 범위를 사용하여 지도의 표시 영역을 설정합니다.
9. `kickGoingMap.setRegion(region, animated: true)`: 지도의 중심과 줌 레벨을 설정합니다. 이는 애니메이션과 함께 지도를 서울 시청에 초점을 맞춥니다. 이와 같이 이 코드는 지도를 표시하고, 사용자 위치를 업데이트하며, 지도의 초기 표시 영역을 설정하는 기능을 합니다.
6. 지도에 annotation하기 위해 더미데이터 넣기
- 우선 더미데이터의 데이터 모델을 만들자.
RideData.Swift 파일을 추가해서, Rideable 프로토콜을 준수하는 RideData를 만들었다.
import Foundation

struct RideData: Rideable {
    var id: Int
    var title : String
    var subtitle : String
    var latitude : Double
    var longitude : Double
}import Foundation
protocol Rideable {
var id: Int { get set }
var title: String { get set }
var subtitle: String { get set }
var latitude: Double { get set }
var longitude: Double { get set }
}-> 타입의 유용성을 위해 Rideable 프로토콜화했으나, 프로젝트에서는 코드만 존재하고 활용하지는 못했다.
7. 이제는 ViewController에서 더미데이터와 데이터를 추가할 수 있도록 빈배열(var dataSource: [RideData] = [] 을 만들어보자.
    // MARK: - Properties
    var dataSource: [RideData] = []
    var kickboardItems: [RideData] = [
        RideData(id: 0, title: "킥보드1", subtitle: "대여가능", latitude: 37.5665, longitude: 126.9774),
        RideData(id: 1, title: "킥보드2", subtitle: "대여 중", latitude: 37.5660, longitude: 126.9805),
        RideData(id: 2, title: "킥보드3", subtitle: "대여가능", latitude: 37.5640, longitude: 126.9791),
        RideData(id: 3, title: "킥보드4", subtitle: "대여가능", latitude: 37.5658, longitude: 126.9818),
        RideData(id: 4, title: "킥보드5", subtitle: "대여 중", latitude: 37.5647, longitude: 126.9768),
    ]
    var bicycleItems: [RideData] = [
        RideData(id: 0, title: "자전거1", subtitle: "대여가능", latitude: 37.5665, longitude: 126.9770),
        RideData(id: 1, title: "자전거2", subtitle: "대여가능", latitude: 37.5662, longitude: 126.9801),
        RideData(id: 2, title: "자전거3", subtitle: "대여가능", latitude: 37.5643, longitude: 126.9793),
        RideData(id: 3, title: "자전거4", subtitle: "대여가능", latitude: 37.5655, longitude: 126.9815),
        RideData(id: 4, title: "자전거5", subtitle: "대여가능", latitude: 37.5642, longitude: 126.9763),
    ]

    let locationManager = CLLocationManager()

    enum RentalItemType {
        case kickboard(RideData)
        case bicycle(RideData)
        case none
    }
-> 더미데이터 kickboardItems, bicycleItems를 객체화하였다.
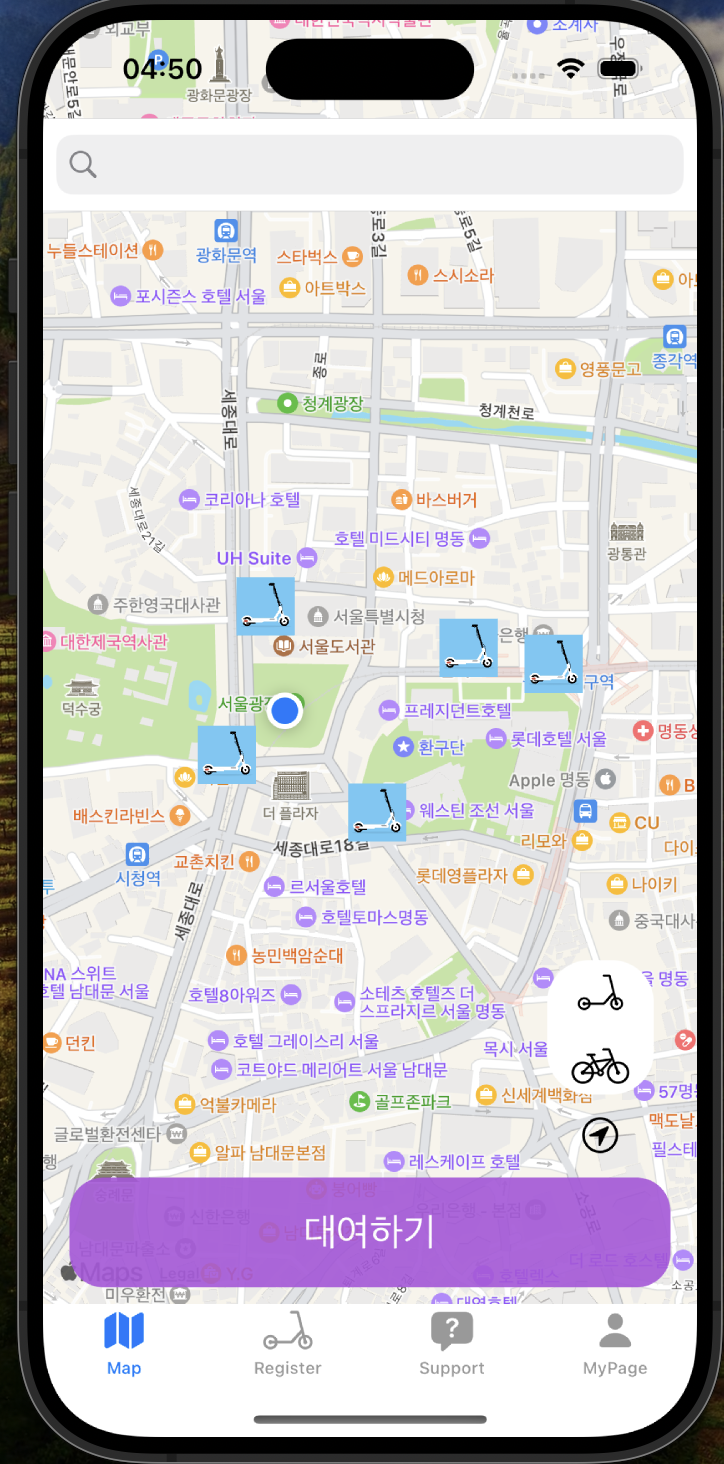
7. 원하는 위치에 핀 표시하기(annotation 추가하기)
- 처음 사용했던 Mapkit인지라, 하나의 ViewController에 데이터모델을 사용하는 함수들이 함께 들어가 있다.
(나중에는 MVVM패턴으로 View와 ViewModel을 분리해서 구현해봐야겠다.)
7-1. 지도에 원하는 1) 위도, 경도, 범위로 원하는 위치를 표시하고, 2) 현재위치 최신화, 3) 킥보드 관련 서비스 버튼을 구현하였다.
// MARK: - Methods
    // 파라미터 : 위도, 경도, 범위로 원하는 위치 표시
    func goLocation(latitudeValue: CLLocationDegrees, longitudeValue: CLLocationDegrees, delta span : Double) -> CLLocationCoordinate2D {
        let toGoLocation = CLLocationCoordinate2DMake(latitudeValue, longitudeValue)
        let spanValue = MKCoordinateSpan(latitudeDelta: span, longitudeDelta: span)
        let toGoRegion = MKCoordinateRegion(center: toGoLocation, span: spanValue)
        kickGoingMap.setRegion(toGoRegion, animated: true)

        return toGoLocation // CLLocationCoordinate2DMake(latitudeValue, longitudeValue)을 호출
    }

    //locations.last 마지막 지점의 위,경도를 100배로 확대해서 표시
    func locationManager(_ manager: CLLocationManager, didUpdateLocations locations: [CLLocation]) {
        let goToLocation = locations.last
        //toGoLocation의 정보를 받아 위도, 경도, 범위를 주입
        _ = goLocation(latitudeValue: (goToLocation?.coordinate.latitude)!, longitudeValue: (goToLocation?.coordinate.longitude)!, delta: 0.01)

        CLGeocoder().reverseGeocodeLocation(goToLocation!, completionHandler: {
            (placemarks, error) -> Void in
            let pm = placemarks!.first
            let country = pm!.country
            var address:String = country!
            if pm!.locality != nil {
                address += " "
                address += pm!.locality!
            }
            if pm!.thoroughfare != nil {
                address += " "
                address += pm!.thoroughfare!
            }
            print(address)
        })
        locationManager.stopUpdatingLocation()
    }
    // MARK: - Action Methods

    @IBAction func tappedCurrentLocation(_ sender: Any) {
        //CLLocationManager() xcode에서 제공하는 위치매니저 매소드에서 startUpdatingLocation을 실행
        locationManager.startUpdatingLocation()
        print("현재위치 버튼이 탭 되었습니다.")
    }

    @IBAction func tappedButtonBorrow(_ sender: UIButton) {
        if let myKickboardID = selectedKickboardID, let kickboardToBorrow = kickboardItems.first(where: { $0.id == selectedKickboardID }) {
            if kickboardToBorrow.subtitle == "대여가능" {
                print("킥보드 대여하기가 신청되었습니다.")
                showMyViewControllerInACustomizedSheet()
                DispatchQueue.main.async {
                    self.buttonKickboard.backgroundColor = .green
                    self.buttonBicycle.backgroundColor = .white
                }
            } else {
                alertButton(in: self, title: "이미 대여 중인 킥보드입니다.", messgae: "대여를 원하신다면 '네'를 눌러주세요.")
            }
        } else if let myBicylceID = selectedBicycleID, let bicycleToBorrow = bicycleItems.first(where: {$0.id == selectedBicycleID}) {
            if bicycleToBorrow.subtitle == "대여가능" {
                print("자전거 대여하기가 신청되었습니다.")
                DispatchQueue.main.async {
                    self.buttonBicycle.backgroundColor = .green
                    self.buttonKickboard.backgroundColor = .white
                }
            } else {
                alertButton(in: self, title: "이미 대여 중인 자전거입니다.", messgae: "대여를 원하신다면 '네'를 눌러주세요.")
            }
        } else {
            let notSelectedMessage = "선택된 킥보드 또는 자전거가 없습니다."
            alertButton(in: self, title: notSelectedMessage, messgae: "대여를 원하신다면 '네'를 눌러주세요.")
        }
    }

    @IBAction func tappedButtonKickboard(_ sender: UIButton) {
        print("킥보드 표시 버튼이 탭 되었습니다.")

        removeAnnotationsFromMap()

        kickboardItems += KickboardManager.shared.kickboardItems
        let dataSource = kickboardItems
        for kickboard in dataSource {
            setAnnotation(title: kickboard.title, subtitle: kickboard.subtitle, latitudeValue: kickboard.latitude, longitudeValue: kickboard.longitude, delta: 0.01)
        }
        locationManager.stopUpdatingLocation()
    }

    @IBAction func tappedButtonBicycle(_ sender: UIButton) {
        print("자전거 표시 버튼이 클릭되었습니다.")

        removeAnnotationsFromMap()

        let dataSource = bicycleItems
        for bicycle in dataSource {
            setAnnotation(title: bicycle.title, subtitle: bicycle.subtitle, latitudeValue: bicycle.latitude, longitudeValue: bicycle.longitude, delta: 0.01)
        }
        locationManager.stopUpdatingLocation()
    }
}
해석
1. `goLocation(latitudeValue:longitudeValue:delta:)`: 이 메서드는 매개변수로 주어진 위도, 경도, 범위를 이용해 특정 위치로 이동하고 그 위치를 반환합니다. 이때 지도의 중심 좌표와 줌 레벨이 설정됩니다.
2. `locationManager(_:didUpdateLocations:)`: 이 메서드는 위치 관리자가 위치 업데이트를 받을 때마다 호출됩니다. 가장 최근의 위치를 받아 `goLocation` 메서드를 이용해 그 위치로 이동하고, 그 위치의 주소를 역지오코딩으로 얻어 출력합니다. 마지막으로 위치 업데이트를 중지합니다.
3. `tappedCurrentLocation(_:)`: 현재 위치 버튼이 탭되었을 때 호출되는 메서드입니다. 위치 업데이트를 시작하고, "현재위치 버튼이 탭 되었습니다."를 출력합니다.
4. `tappedButtonBorrow(_:)`: 대여 버튼이 탭되었을 때 호출되는 메서드입니다. 선택된 킥보드 또는 자전거가 있는지 확인하고, 해당 아이템이 대여 가능한 상태인지 확인한 후, 대여를 진행합니다.
5. `tappedButtonKickboard(_:)`: 킥보드 표시 버튼이 탭되었을 때 호출되는 메서드입니다. 지도에 표시된 주석을 모두 제거하고, 킥보드의 정보를 지도에 표시합니다.
6. `tappedButtonBicycle(_:)`: 자전거 표시 버튼이 탭되었을 때 호출되는 메서드입니다. 지도에 표시된 주석을 모두 제거하고, 자전거의 정보를 지도에 표시합니다. 이렇게 각 메서드는 사용자의 액션에 따라 위치 정보를 업데이트하거나, 지도에 표시할 아이템을 변경하는 등의 역할을 합니다.
8. 지도에 있는 킥보드 아이콘을 클릭했을 때 => 지도의 annotation이 클릭되었을 때 킥보드의 상태를 표시하는 기능을 구현하였다.
import MapKit

// 지도의 annotation을 didSelect 때 selectedKickboardID으로 프로퍼티가 전송되는 매서드
extension MapViewController {
    func mapView(_ mapView: MKMapView, didSelect view: MKAnnotationView) {
        guard let annotaion = view.annotation else { return }

        if let title = annotaion.title, let selectedKicboard = kickboardItems.first(where: {$0.title == title}) {
            self.selectedKickboardID = selectedKicboard.id
        } else if
            let title = annotaion.title, let selectedbicycle = bicycleItems.first(where: {$0.title == title}) {
            self.selectedBicycleID = selectedbicycle.id
        } else {
            print("선택한 킥보드를 찾을 수 없습니다.")
        }
    }
}
해석
이 코드는 MapKit의 MKMapViewDelegate 메서드인 `mapView(_:didSelect:)`를 재정의하는 코드입니다.
이 메서드는 사용자가 지도의 주석(annotation)을 선택했을 때 호출됩니다. 기능은 다음과 같습니다:
1. 사용자가 지도의 주석(annotation)을 선택하면, 해당 주석의 정보를 가져옵니다.
2. 가져온 주석의 제목(title)이 킥보드 더미데이터의 아이템 목록(kickboardItems)에 있는 아이템의 제목과 일치하는지 확인합니다. 일치하는 킥보드 아이템이 있다면, 그 킥보드 아이템의 ID를 `self.selectedKickboardID`에 저장합니다.
3. 킥보드 아이템 목록에 일치하는 아이템이 없다면, 주석의 제목이 자전거 아이템 목록(bicycleItems)에 있는 아이템의 제목과 일치하는지 확인합니다. 일치하는 자전거 아이템이 있다면, 그 자전거 아이템의 ID를 `self.selectedBicycleID`에 저장합니다.
4. 둘 다 일치하는 아이템이 없다면, "선택한 킥보드를 찾을 수 없습니다."라는 메시지를 출력합니다. 이렇게 이 코드는 사용자가 지도의 주석을 선택했을 때, 해당 주석이 어떤 킥보드 아이템 또는 자전거 아이템을 나타내는지 판별하고 그 정보를 저장하는 기능을 합니다.
9. MapKit에서 제공하는 annotation은 핀포인트 이기 때문에, 킥보드 아이콘으로 커스텀하였다.
//
//  MKMapView.swift
//  Kick_Going
//
//  Created by Jason Yang on 1/17/24.
//

import MapKit

extension MapViewController {
    func mapView(_ mapView: MKMapView, viewFor annotation: MKAnnotation) -> MKAnnotationView? {
        // 사용자의 위치 표시는 변경하지 않습니다.
        if annotation is MKUserLocation {
            return nil
        }

        let identifier = "Kickboard"
        var annotationView = mapView.dequeueReusableAnnotationView(withIdentifier: identifier) as? MKPinAnnotationView

        if annotationView == nil {
            annotationView = MKPinAnnotationView(annotation: annotation, reuseIdentifier: identifier)
            annotationView?.canShowCallout = true
        } else {
            annotationView?.annotation = annotation
        }

        // 킥보드 이미지로 설정
        annotationView?.image = UIImage(named: "kickboard")

        let size = CGSize(width: 35, height: 35)
        annotationView?.frame = CGRect(origin: annotationView?.frame.origin ?? CGPoint.zero, size: size)

        return annotationView
    }
}
해석
이 코드는 MapKit의 MKMapViewDelegate 메서드인 `mapView(_:viewFor:)`를 재정의하는 코드입니다.
이 메서드는 지도에 주석(annotation)을 표시할 때 호출되며, 주석의 뷰를 정의하는 역할을 합니다. 기능은 다음과 같습니다:
1. `if annotation is MKUserLocation { return nil }`: 주석이 사용자의 위치를 나타내는 경우에는 기본 뷰를 사용하도록 nil을 반환합니다.
2. `let identifier = "Kickboard"`: 재사용 가능한 주석 뷰의 식별자를 "Kickboard"로 설정합니다.
3. `var annotationView = mapView.dequeueReusableAnnotationView(withIdentifier: identifier) as? MKPinAnnotationView`: 지도에서 재사용 가능한 주석 뷰를 가져옵니다. 이는 성능 향상을 위해 사용됩니다.
4. `if annotationView == nil { ... } else { ... }`: 재사용 가능한 주석 뷰가 없는 경우에는 새로운 주석 뷰를 생성하고, 있는 경우에는 주석 뷰의 주석을 현재 주석으로 설정합니다.
5. `annotationView?.image = UIImage(named: "kickboard")`: 주석 뷰의 이미지를 "kickboard" 이미지로 설정합니다. 이 이미지는 프로젝트의 애셋 카탈로그에 있어야 합니다.
6. `let size = CGSize(width: 35, height: 35); annotationView?.frame = CGRect(origin: annotationView?.frame.origin ?? CGPoint.zero, size: size)`: 주석 뷰의 크기를 35x35로 설정합니다.
7. `return annotationView`: 설정이 완료된 주석 뷰를 반환합니다. 이렇게 이 코드는 지도의 주석이 어떻게 보여질지를 정의합니다. 여기서는 주석을 "kickboard" 이미지로 표시하고 크기를 35x35로 설정하였습니다.
10. MapKit의 내장 매소드인 setAnnotation을 사용하여 원하는 위치와 경도에 annotation을 설치하였다.
//
//  setAnnotation.swift
//  Kick_Going
//
//  Created by Jason Yang on 1/17/24.
//

import MapKit

extension MapViewController {
    //원하는 위도와 경도에 핀 설치
    func setAnnotation(title strTitle: String, subtitle strSubtitle: String, latitudeValue: CLLocationDegrees, longitudeValue: CLLocationDegrees, delta span: Double) {
        let annotation = MKPointAnnotation()
        annotation.coordinate = goLocation(latitudeValue: latitudeValue, longitudeValue: longitudeValue, delta: span)
        annotation.title = strTitle
        annotation.subtitle = strSubtitle
        kickGoingMap.addAnnotation(annotation)
    }
    func removeAnnotationsFromMap() {
        let annotations = kickGoingMap.annotations
        kickGoingMap.removeAnnotations(annotations)
    }
}
지금까지 살펴본 MapKit은 UIKit에서 사용하는 방법이다.
SwiftUI에서는 더욱 편리하게 사용가능하다. 아래의 영상 참고
https://developer.apple.com/videos/play/wwdc2023/10043/
Meet MapKit for SwiftUI - WWDC23 - Videos - Apple Developer
Discover how expanded SwiftUI support for MapKit has made it easier than ever for you to integrate Maps into your app. We'll show you how...
developer.apple.com
'Xcode Study' 카테고리의 다른 글
| 러닝기록 타이머 만들기(1/3)(with thread, RunLoop) (0) | 2024.02.26 |
|---|---|
| UIPageController(작성중) (0) | 2024.02.22 |
| TIL 열심히 하자! (0) | 2024.02.20 |
| DTO(Data Tranfer Object)란? (0) | 2024.02.15 |
| 5일치 3시간 단위 날씨예보 배열에 넣기(with OpenWeatherMap) (2/2) (0) | 2024.02.15 |

