
| 일 | 월 | 화 | 수 | 목 | 금 | 토 |
|---|---|---|---|---|---|---|
| 1 | ||||||
| 2 | 3 | 4 | 5 | 6 | 7 | 8 |
| 9 | 10 | 11 | 12 | 13 | 14 | 15 |
| 16 | 17 | 18 | 19 | 20 | 21 | 22 |
| 23 | 24 | 25 | 26 | 27 | 28 |
Tags
- 러닝타이머
- CoreLocation
- weatherKit
- font book
- addannotation
- App Store Connect
- Timer
- 한국어 개인정보처리방침
- Startign Assignments
- CLLocationManagerDelegate
- MKMapItem
- MKMapViewDelegate
- 단일 책임원칙
- RunningTimer
- AnyObject
- swift
- 영문 개인정보처리방침
- 클로저의 캡슐화
- Protocol
- xcode로 날씨앱 만들기
- weak var
- 러닝기록앱
- SwiftUI Boolean 값
- UICollectionViewFlowLayout
- UIAlertAction
- WeatherManager
- Required Reason API
- 서체관리자
- dispatchsource
- Xcode
Archives
- Today
- Total
VesselWheel
programmatically TabBarController 만들기 본문
TabBarController란?
더보기
UITabBarController 기초
- 탭 기반의 인터페이스:
- UITabBarController는 탭 바를 통해 여러 뷰 컨트롤러를 표시하고, 사용자는 탭을 선택하여 해당 뷰 컨트롤러로 이동할 수 있습니다.
- UIViewController 관리:
- 각 탭은 하나의 UIViewController와 관련되어 있으며, 탭이 선택되면 해당 뷰 컨트롤러가 화면에 표시됩니다.
- 탭 바 아이템:
- 각 뷰 컨트롤러는 탭 바에 아이콘 및 텍스트로 표시되는 탭 바 아이템을 가지고 있습니다.
UITabBarController 고급 기능
- Custom Tab Bar Item:
- 탭 바 아이템을 커스텀하여 아이콘, 텍스트, 색상 등을 사용자 정의할 수 있습니다.
- Delegate 활용:
- UITabBarControllerDelegate 프로토콜을 활용하여 탭이 선택되거나 변경될 때의 이벤트를 처리할 수 있습니다.
- 동적 탭 관리:
- 실행 중에 뷰 컨트롤러를 동적으로 추가하거나 삭제하여 탭의 내용을 동적으로 변경할 수 있습니다.
탭 간 데이터 공유
- Singleton 또는 Shared 인스턴스 활용:
- 탭 간 데이터를 공유하기 위해 Singleton 패턴 또는 Shared 인스턴스를 활용할 수 있습니다.
- Notification Center 활용:
- Notification Center를 사용하여 한 탭에서 발생한 이벤트를 다른 탭에서 수신하고 처리할 수 있습니다.
탭 간 상태 유지
- UserDefaults 활용:
- UserDefaults를 사용하여 앱 내에 간단한 설정이나 상태를 저장하고 불러와 탭 간에 공유할 수 있습니다.
- 데이터베이스 또는 파일 저장:
- CoreData 또는 파일 시스템을 활용하여 더 복잡한 데이터를 탭 간에 유지할 수 있습니다.
주의사항 및 Best Practices
- 메모리 관리:
- UITabBarController는 자체적으로 뷰 컨트롤러를 관리하므로 메모리 누수에 주의해야 합니다.
- 사용자 경험:
- 너무 많은 탭을 사용하면 사용자 경험이 나빠질 수 있으므로, 적절한 수의 탭을 선택하는 것이 중요합니다.
1. 우선 storyboard 관련 사항을 삭제한다. (이전 글 URL 참조)
https://vesselwheel.tistory.com/169
programmatic UI 프로젝트 구성하기(feat. xcode)
UIKit Code로 쓰는 UI 장점 유지보수 용이성: 코드로 UI를 작성하면 코드의 버전 관리 및 수정이 용이하며, 코드베이스를 유지 비용이 적습니다. Git과 같은 버전 관리 도구를 활용하여 협업 시 코드
vesselwheel.tistory.com
2. SceneDelegate 수정하기
import UIKit

class SceneDelegate: UIResponder, UIWindowSceneDelegate {

    var window: UIWindow?


    func scene(_ scene: UIScene, willConnectTo session: UISceneSession, options connectionOptions: UIScene.ConnectionOptions) {
        // Use this method to optionally configure and attach the UIWindow `window` to the provided UIWindowScene `scene`.
        // If using a storyboard, the `window` property will automatically be initialized and attached to the scene.
        // This delegate does not imply the connecting scene or session are new (see `application:configurationForConnectingSceneSession` instead).
        guard let windowScene = (scene as? UIWindowScene) else { return }
        window = UIWindow(windowScene: windowScene)
        let tabvc = UITabBarController()
        tabvc.viewControllers = [FirstViewController(), SecondViewController()]
//        let navc = UINavigationController(rootViewController: ViewController())
//        window?.rootViewController = navc
        window?.rootViewController = MainTabBarController()
        window?.makeKeyAndVisible()
    }
3. VicwController에서 Tabbar별로 각각의 ViewController 만들기
//
// ViewController.swift
// tabBarController
//
// Created by Jason Yang on 1/24/24.
//
import UIKit
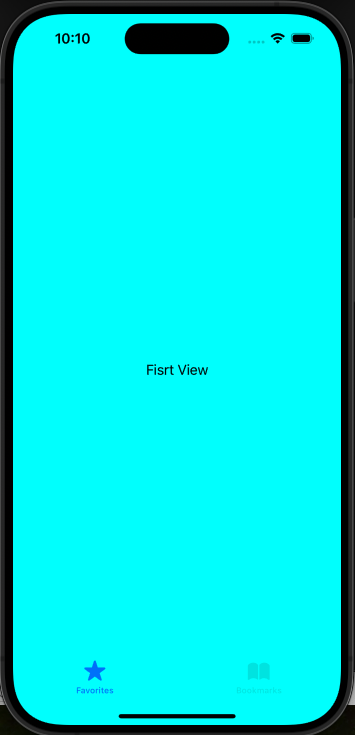
class FirstViewController: UIViewController {
override func viewDidLoad() {
super.viewDidLoad()
view.backgroundColor = .cyan
let label = UILabel()
label.text = "Fisrt View"
label.textAlignment = .center
label.translatesAutoresizingMaskIntoConstraints = false
view.addSubview(label)
NSLayoutConstraint.activate([
label.centerXAnchor.constraint(equalTo: view.centerXAnchor),
label.centerYAnchor.constraint(equalTo: view.centerYAnchor)
])
}
}
/*
- **`super`** 키워드는 자식 클래스에서 부모 클래스의 메서드, 속성 또는 초기화 메서드를 호출할 때 사용됩니다.
- 부모 클래스의 메서드를 호출하거나 부모 클래스의 초기화 메서드를 호출하는 데 사용됩니다.
- **`super.method()`** 또는 **`super.property`**와 같이 사용하여 부모 클래스의 기능을 호출할 수 있습니다.
*/
class SecondViewController: UIViewController {
override func viewDidLoad() {
super.viewDidLoad() //UIViewController 의 매서드 viewDidLoad()
view.backgroundColor = .magenta
let label = UILabel()
label.text = "Second View"
label.textAlignment = .center
label.translatesAutoresizingMaskIntoConstraints = false
view.addSubview(label)
NSLayoutConstraint.activate([
label.centerXAnchor.constraint(equalTo: view.centerXAnchor),
label.centerYAnchor.constraint(equalTo: view.centerYAnchor)
])
}
}
class MainTabBarController: UITabBarController {
override func viewDidLoad() {
super.viewDidLoad()
// 첫 번째 탭
let firstViewController = FirstViewController()
let firstNavigationController = UINavigationController(rootViewController: firstViewController)
firstNavigationController.tabBarItem = UITabBarItem(tabBarSystemItem: .favorites , tag: 0)
// 두 번째 탭
let secondeViewController = SecondViewController()
let secondNavigationController = UINavigationController(rootViewController: secondeViewController)
secondNavigationController.tabBarItem = UITabBarItem(tabBarSystemItem: .bookmarks, tag: 1)
// UITabBarController에 UINavigationController 추가
viewControllers = [firstNavigationController, secondNavigationController]
}
}해석
1. SceneDelegate에서 window?.rootViewController = MainTabBarController()으로 지정해준,
Class MainTabBarController에서 각각,
let firstViewController = ViewController()
let secondeViewController = SecondViewController()
으로 초기화 해준다.
2. 초기화 해준 각각의 ViewController()와, SecondViewController()를 tabBarItem에 tag를 Int값으로 지정해준다.
let firstNavigationController = UINavigationController(rootViewController: firstViewController)
        firstNavigationController.tabBarItem = UITabBarItem(tabBarSystemItem: .favorites , tag: 0)
let secondNavigationController = UINavigationController(rootViewController: secondeViewController)
secondNavigationController.tabBarItem = UITabBarItem(tabBarSystemItem: .bookmarks, tag: 1)
3. 마지막으로, 지정해준 ViewController들을 UINavigationController 추가해준다.
// UITabBarController에 UINavigationController 추가
viewControllers = [firstNavigationController, secondNavigationController]'Xcode Study' 카테고리의 다른 글
| 같이 일하고 싶은 개발자 (0) | 2024.01.31 |
|---|---|
| programmatically NavigationController 만들기(feat. NavigationItem, toolbar, UINavigationControllerDelegate) (1) | 2024.01.31 |
| programmatic UI 프로젝트 구성하기(feat. xcode) (0) | 2024.01.26 |
| xcode에서 동영상 재생 구현하기(feat. AVKit in CodeBase) (0) | 2024.01.25 |
| iOS 아키텍처 패턴 이해하기(MVC, MVVM) (0) | 2024.01.23 |
'Xcode Study' Related Articles
more


