
| 일 | 월 | 화 | 수 | 목 | 금 | 토 |
|---|---|---|---|---|---|---|
| 1 | 2 | 3 | 4 | 5 | ||
| 6 | 7 | 8 | 9 | 10 | 11 | 12 |
| 13 | 14 | 15 | 16 | 17 | 18 | 19 |
| 20 | 21 | 22 | 23 | 24 | 25 | 26 |
| 27 | 28 | 29 | 30 |
- SwiftUI Boolean 값
- xcode로 날씨앱 만들기
- Required Reason API
- 러닝타이머
- dispatchsource
- 클로저의 캡슐화
- font book
- MKMapItem
- Timer
- 영문 개인정보처리방침
- RunningTimer
- App Store Connect
- addannotation
- Xcode
- UICollectionViewFlowLayout
- CLLocationManagerDelegate
- WeatherManager
- 단일 책임원칙
- weatherKit
- weak var
- AnyObject
- 한국어 개인정보처리방침
- Startign Assignments
- 서체관리자
- CoreLocation
- UIAlertAction
- 러닝기록앱
- Protocol
- MKMapViewDelegate
- swift
- Today
- Total
VesselWheel
weatherKit을 활용한 러닝맵에 날씨정보 호출하기 Vol.2(with Combine, ViewModel) 본문
weatherKit을 활용한 러닝맵에 날씨정보 호출하기 Vol.2(with Combine, ViewModel)
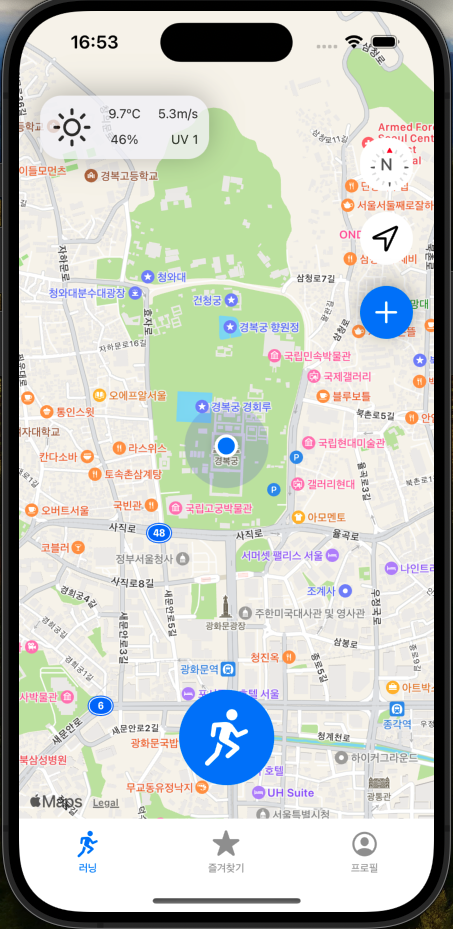
JasonYang 2024. 3. 13. 17:22앞선 게시물에 이어서, weatherKit을 활용한 날씨정보를 러닝맵뷰의 좌상단에 노출하고자 한다.
1. weatherKit을 활용한 WeatherViewModel
//
//  WeatherViewModel.swift
//  Run-It
//
//  Created by Jason Yang on 3/12/24.
//

import Foundation
import WeatherKit
import CoreLocation
import Combine

class WeatherViewModel: ObservableObject {
    // UI Properties
    @Published var weathersymbolName: String = ""
    @Published var currentTemperature: Double = 0
    @Published var currenthumidity: Double = 0
    @Published var windspeed: Double = 0
    @Published var uvIndexcategory: Int = 0

    func getWeather(location: CLLocation) {
        Task {
            do {
                let weather = try await WeatherService.shared.weather(for: location)

                DispatchQueue.main.async { [weak self] in
                    guard let self = self else { return }
                    print("날씨기호 이름: \(self.weathersymbolName), 온도: \(self.currentTemperature)°C, 습도: \(self.currenthumidity)%, 풍속: \(self.windspeed)m/s, UV 지수: \(self.uvIndexcategory)")
                    self.weathersymbolName = weather.currentWeather.symbolName
                    self.currentTemperature = weather.currentWeather.temperature.converted(to: .celsius).value
                    self.currenthumidity = weather.currentWeather.humidity
                    self.windspeed = weather.currentWeather.wind.speed.converted(to: .metersPerSecond).value
                    self.uvIndexcategory = weather.currentWeather.uvIndex.value

                }
            } catch {
                print("날씨 데이터를 불러오는 데 실패했습니다: \(String(describing: error))")
            }
        }
    }
}
2. ViewController에서 바인딩한 매소드 bindViewModel()
//MARK: - Weather Setup
extension RunningMapViewController {

    func bindViewModel() {
        // 현재 위치 정보가 있는지 확인
        if let location = self.currentLocation {
            print("현재 위치: 위도 \(location.coordinate.latitude), 경도 \(location.coordinate.longitude)")
            // 위치 정보가 있을 경우, 해당 위치를 사용하여 날씨 정보를 업데이트
            weatherViewModel.getWeather(location: location)

            weatherViewModel.$weathersymbolName.receive(on: DispatchQueue.main).sink { [weak self] weatherSymbol in
                self?.weatherSymbol.image = UIImage(systemName: weatherSymbol)
            }.store(in: &cancellables)

            weatherViewModel.$currentTemperature.receive(on: DispatchQueue.main).sink { [weak self] temperatureLabel in
                let roundedTemperature = round(temperatureLabel * 10) / 10.0
                self?.temperatureLabel.text = "\(roundedTemperature)ºC"
            }.store(in: &cancellables)

            weatherViewModel.$currenthumidity.receive(on: DispatchQueue.main).sink { [weak self] humidityLabel in
                let percentageHumidity = Int(humidityLabel * 100) // 백분율로 변환 후 정수로 표시
                self?.humidityLabel.text = "\(percentageHumidity)%"
            }.store(in: &cancellables)

            weatherViewModel.$windspeed.receive(on: DispatchQueue.main).sink { [weak self] windspeedLabel in
                let roundedwindspeed = round(windspeedLabel * 10) / 10.0
                self?.windspeedLabel.text = "\(roundedwindspeed)m/s"
            }.store(in: &cancellables)

            weatherViewModel.$uvIndexcategory.receive(on: DispatchQueue.main).sink { [weak self] uvIndexcategoryLabel in
                self?.uvIndexcategoryLabel.text = "UV \(uvIndexcategoryLabel)"
            }.store(in: &cancellables)
        } else {
            print("no location data")
        }
    }

}
-> 뷰 모델을 통해서 퍼블리쉬(발표, 참조할 수 있는) 상태인 프로퍼티를 뷰에서 바인딩(조합, 묶음)하여 receive매소드로 참조로 받아,
sink로 해당 프로퍼티에 주입해고, store 매소드로 취소할 수 있는calcellables의 배열에 저장한다.
이때 이 프로퍼티는
var cancellables = Set<AnyCancellable>()전역상수로 취소할 수 있는, 즉 지울 수 있는 상태로 선언한다.
여기서 잠깐 비동기 프로그램인 Combine에 대해 알아보면,
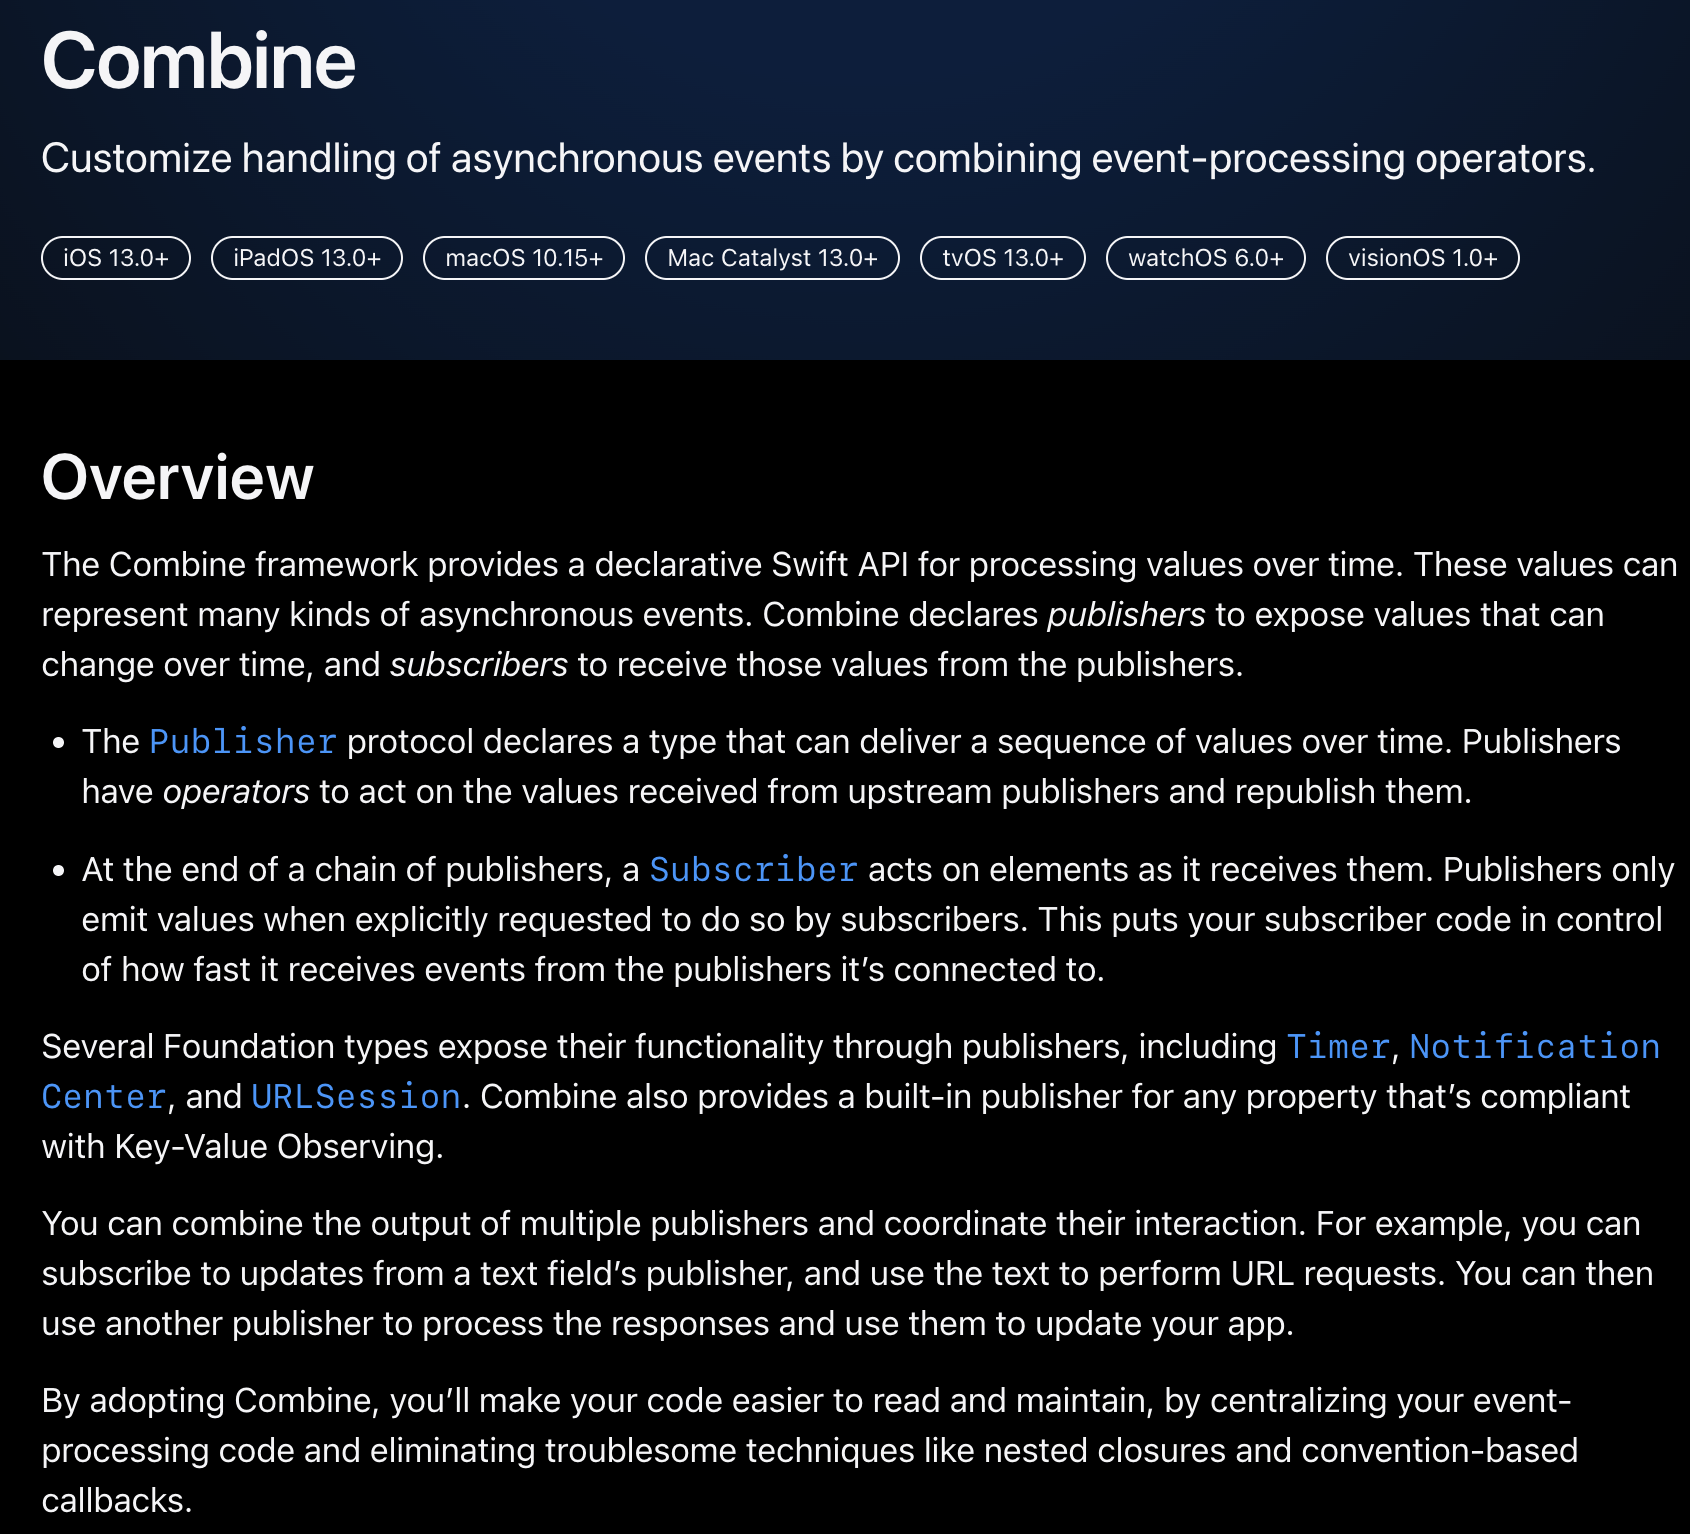
컴바인은 선언적 Swift API로 시간 경과에 따라 값 처리를 한다.
노티피케이션 처럼, 한 쪽에서 선언하면, 다른 쪽에서 구독하듯이,
컴바인은 Swift가 API 화해서 내부 매소드를 만들어, 개발자가 편하게 프로퍼티(값)을 발표(방출)하고, 다른 쪽에서 구독하여 비동기적으로 값을 공유할 수 있다.
내가 이해한 바로는 종이컵 전화기의 실(체인)처럼, 양 끝에 연결된 종이컵을 실이 연결하여 진동값으로 소리를 전달할 수 있듯이,
컴바인의 내부 매소드가 실 역할로 양자간의 데이터 전달을 도와주는 것이다.
컴바인의 extension에는 아래와 같이 Publisher, Subscriber, Cancellable 등이 있다.

그렇다면, Publisher인 receive 매소드는 무엇일까?
receive(on:options:)은 Combine의 operator 중 하나로, upstream publisher로부터 나오는 출력을 특정 스케줄러에서 받도록 지정합니다.
이를 통해, 예를 들어 메인 스레드에서 UI를 업데이트하거나 다른 스레드에서 시간이 많이 걸리는 작업을 실행할 때 유용합니다.
여기서 S는 Scheduler 프로토콜을 준수하는 어떤 타입이 될 수 있습니다.
Scheduler 프로토콜은 작업을 특정 시점에 실행하거나 취소할 수 있는 메서드를 정의합니다.
이 프로토콜은 Swift의 Combine 프레임워크에서 비동기 코드를 관리하는 데 중요한 역할을 합니다.
주의 사항
- receive(on:options:)을 사용할 때는 작업을 올바른 스레드나 큐에 배치하는 것이 중요합니다. 잘못된 스레드에서 UI를 업데이트하려 하면 오류가 발생할 수 있습니다.
- Combine은 iOS 13, macOS 10.15, watchOS 6, tvOS 13 이상에서 사용 가능합니다.
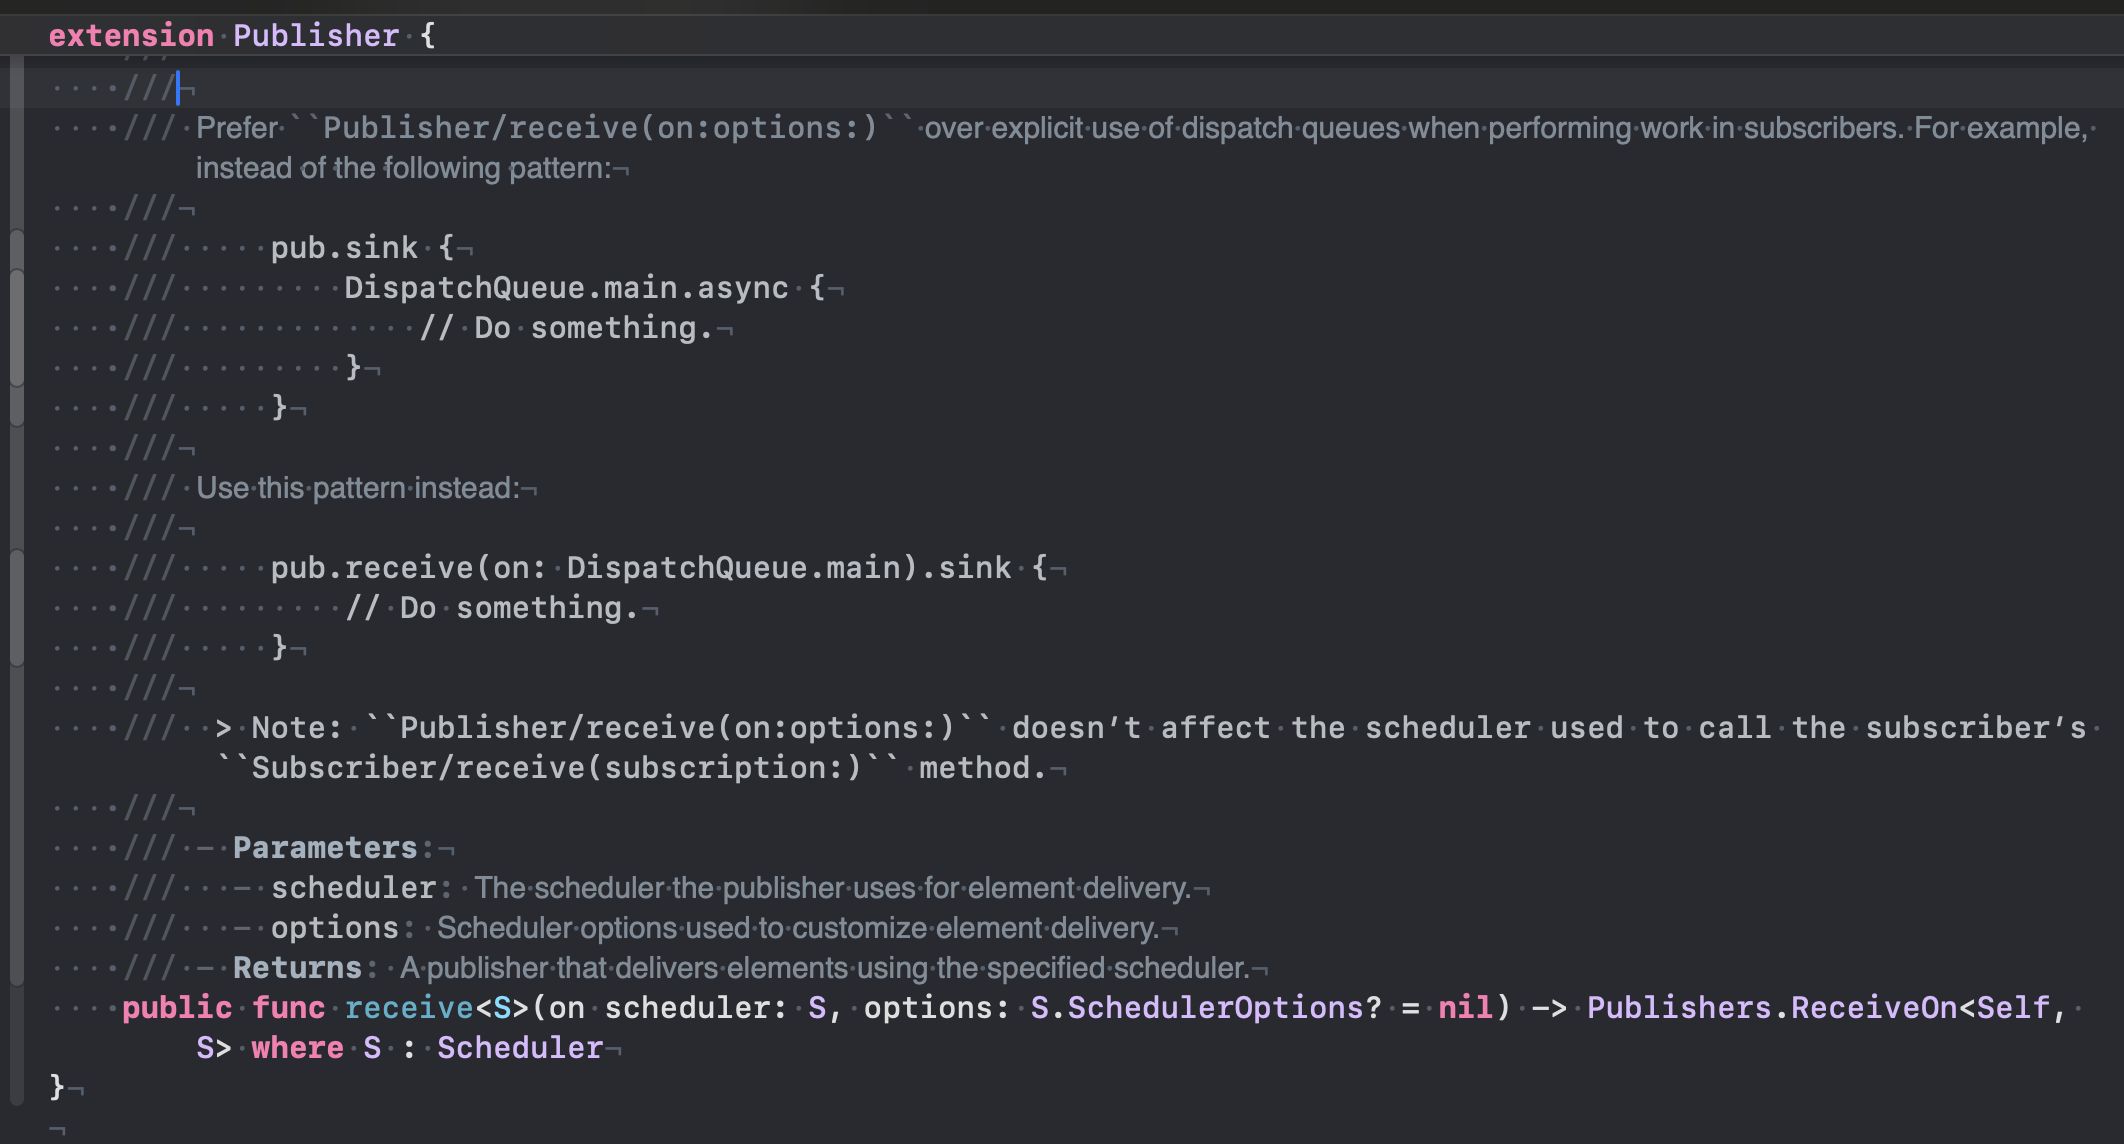
public func receive<S>(on scheduler: S, options: S.SchedulerOptions? = nil) -> Publishers.ReceiveOn<Self, S> where S : Scheduler(교육기관에서는 이런 것까지 가르치지 않고, 상기 extension이 있다고만 알려주어서, 이게 뭐지? 란 의문만 들 뿐이었다. 아쉽다)
on scheduler: S

options: S.SchedulerOptions? = nil

Publishers.ReceiveOn<Self, S> where S : Scheduler
상기 코드 처럼 3가지로 나누어 진다.
상기 전체 코드에서 weatherSymbol를 구독하기 위한 코드를 예를 들면,
weatherViewModel.$weathersymbolName.receive(on: DispatchQueue.main).sink { [weak self] weatherSymbol in
                self?.weatherSymbol.image = UIImage(systemName: weatherSymbol)
            }.store(in: &cancellables)
해석
이 코드는 Swift의 Combine 프레임워크를 사용하여 weatherViewModel의 weatherSymbolName 프로퍼티의 변화를 관찰하고, 해당 변화가 있을 때마다 메인 스레드에서 UI 업데이트를 수행하는 예시입니다. 자세히 살펴보겠습니다.
코드 분석
- weatherViewModel.$weatherSymbolName:
- weatherViewModel의 weatherSymbolName 프로퍼티의 변화를 관찰하기 위해 Combine의 Publisher를 사용합니다. $ 접두사는 weatherSymbolName 프로퍼티가 @Published 속성으로 선언되었음을 나타냅니다. 이는 해당 프로퍼티의 값이 변경될 때마다 구독자에게 알림을 보내는 Publisher를 생성합니다.
- .receive(on: DispatchQueue.main):
- receive(on:) 오퍼레이터를 사용하여 weatherSymbolName 프로퍼티의 값을 메인 디스패치 큐에서 받도록 설정합니다. 이는 UI 업데이트를 메인 스레드에서 수행하려는 목적으로 사용됩니다. UI 작업은 항상 메인 스레드에서 실행되어야 합니다.
- .sink { [weak self] weatherSymbol in ... }:
- sink 메서드는 Publisher로부터 나오는 값을 받아서 처리하는 구독자를 생성합니다. 여기서 클로저는 weatherSymbol이라는 파라미터를 받으며, 이는 weatherSymbolName 프로퍼티의 새로운 값입니다.
- [weak self]는 클로저 내부에서 self (여기서는 보통 클래스의 인스턴스를 가리킵니다)를 약한 참조로 캡처합니다. 이는 순환 참조를 방지하여 메모리 누수를 예방하기 위함입니다.
- 클로저 내부에서는 self?.weatherSymbol.image에 UIImage(systemName: weatherSymbol)을 할당합니다. 즉, weatherSymbol 이름을 가진 시스템 이미지로 weatherSymbol이미지 뷰의 이미지를 업데이트합니다.
- .store(in: &cancellables):
- 생성된 구독을 관리하기 위해 cancellables라는 Set<AnyCancellable>에 저장합니다. 이는 구독을 적절히 해제하고 메모리를 관리하기 위함입니다. store(in:) 메서드를 사용하면, cancellables 집합에 구독을 추가하여 나중에 해당 뷰나 뷰 모델이 소멸될 때 자동으로 구독을 취소합니다.
결론
이 코드는 Combine을 사용하여 weatherViewModel의 weatherSymbolName 프로퍼티의 변화를 관찰하고, 변화가 감지될 때마다 메인 스레드에서 weatherSymbol 이미지 뷰의 이미지를 업데이트하는 방법을 보여줍니다. 이러한 방식은 비동기 작업으로 데이터를 받아와 UI를 업데이트할 때 매우 유용합니다.
뷰모델 적용은 다음편에...
https://developer.apple.com/documentation/combine
Combine | Apple Developer Documentation
Customize handling of asynchronous events by combining event-processing operators.
developer.apple.com
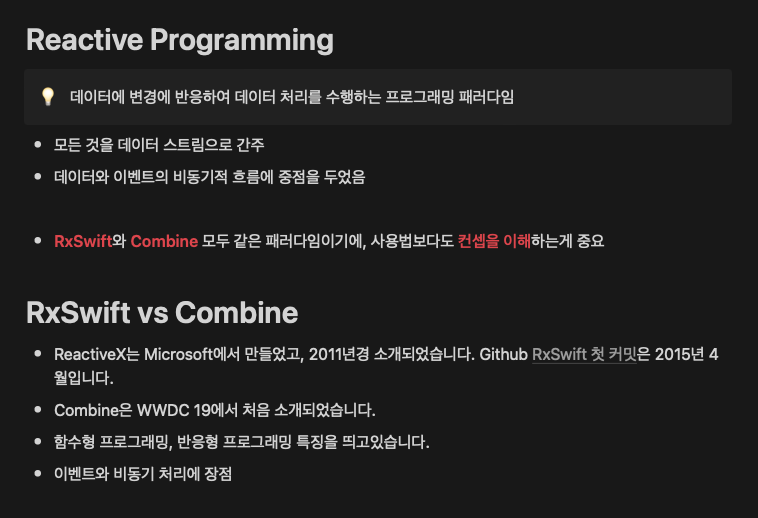
https://voracious-pigment-aaf.notion.site/RxSwift-Combine-f1d34c88a46440ddb9bc58120a575997
RxSwift, Combine 프레임워크 소개 및 특징 알아보기 | Notion
공고를 통해 보는 RxSwift, Combine
voracious-pigment-aaf.notion.site
'Xcode Study' 카테고리의 다른 글
| [Trouble Shooting] 러닝맵 업체 정보 버튼 확장 간 RequestQuery 제한(feat. cache) (0) | 2024.03.16 |
|---|---|
| [Trobule Shooting] 러닝타이머 거리값이 pause 버튼을 누렀다가, 다시 재개를 누르면 계속 기록되지 않고 멈춤 (0) | 2024.03.15 |
| weatherKit을 활용한 러닝맵에 날씨정보 호출하기 (0) | 2024.03.12 |
| Apple Developer 등록하기 및 협업하기 (0) | 2024.03.11 |
| MapKit에서 실시간 사용자 위치 추적 및 경로 표시하기 (1) | 2024.03.08 |


